
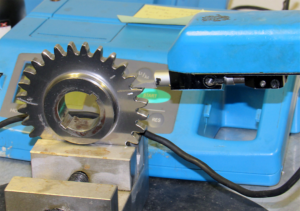
Figure 1: Typical Stylus Profilometer. (Courtesy: REM Surface Engineering)
Optical profilometry uses light instead of a diamond tipped probe to detect the surface irregularities. This non-contacting technique results in a three-dimensional surface measurement. However, all optical profilometers have functions to display two-dimensional surface outputs just like a contact stylus profilometer. According to the Pennsylvania State University Materials Research Institute (PSU/MRI): “An optical profiler is a type of microscope in which light from a lamp is split into two paths by a beam splitter. One path directs the light onto the surface under test, the other path directs the light to a reference mirror. Reflections from the two surfaces are recombined and projected onto an array detector. When the path difference between the recombined beams is on the order of a few wavelengths of light or less interference can occur. This interference contains information about the surface contours of the test surface. Vertical resolution can be on the order of several angstroms while lateral resolution depends upon the objective and is typically in the range of 0.3-8 microns.” [1]
The key to optical profilometry is to direct the light in such a way that the surface irregularities are accurately detected. Orientation of the light to the surface is critical. Highly angled surface orientation will not result in a precise or accurate measurement. Furthermore, to be able to resolve micron surface irregularities, the distance between the surface being measured and the objective lens is very small, typically a millimeter or less.
Optical profilometry can employ different methods for surface detection such as laser triangulation, confocal microscopy, interferometry, or digital holography. See Figure 2 for a schematic of an optical interferometer.
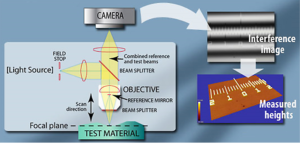
Figure 2: Schematic of an optical interferometer. (Courtesy: Zygo® Corporation)
This was the type of instrument used by the PSU/MRI for the optical measurements presented in the paper at the recent AGMA Fall Technical Meeting: “A Comparison of Surface Roughness Measurement Methods of Gear Tooth working Surfaces.” [2]
An optical profilometer’s measurement rate is based on the speed of the data acquisition by the instrument’s electronics of the light reflected from the component surface.
The time it takes to measure a surface is also dependent on the total area being scanned. Compared to a contact stylus, optical profilometers can capture far greater amounts of surface information and at very high rates. This information can result in a range of analyses depending on the desired output. Macro and micro flank geometry (profile) can be measured by optical profilometry. See the paper by Y. Peng et al., “Areal Evaluation of Involute Gear Flanks with Three-dimensional Surface Data,” [3] for information on optical laser scanning that measured helical flank profiles. This technique is capable of rapid three-dimensional surface measure down to the resolution of surface lay and waviness. Interferometry and confocal profilometry are capable of surface roughness measurement down to the sub-micron range.
Similar to a contact stylus, optical profilometers are solid-state instruments that require little maintenance and utilize precision specimens for calibration. However, optical profilometers are not suitable for shop floor environments. The ISO 25178 series are standards that provide guidance on optical profilometry.
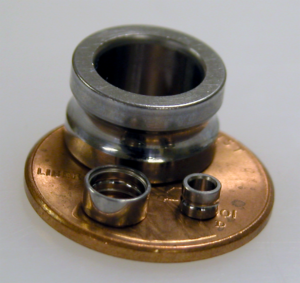
Figure 3: Bearing race set for optical profilometer measurement. (Courtesy: REM Surface Engineering)
An optical profilometry measurement of a metal to metal contact surface is shown in Figure 4. Figure 3 is of a set of small bearing races for isotropic superfinish testing. The larger inner bearing race surface was optically measured for roughness. Figure 4 is the roughness measurement result of this inner bearing race.
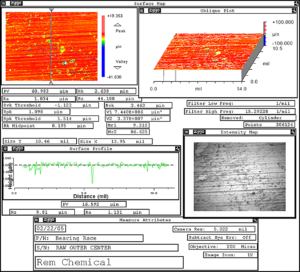
Figure 4: Optical profilometry results of the inner bearing race. (Courtesy: REM Surface Engineering)
Advantages and Disadvantages
Multiple companies offer these types of instruments and optical profilometry has been a well-established technique for more than 20 years. Optical profilometers are capable of accurate and precise roughness measurements typically found on precision manufactured surfaces such as gear flanks (Ra ~0.05 – 5.0 microns). Their outputs can be two- or three-dimensional data sets. They are stable, solid-state instruments that require only periodic calibration using precision specimens.
So why is contact stylus profilometry the dominant roughness measurement method today in the gear industry instead of optical profilometry? There are two basic reasons:
First, the key to a successful optical measurement is the orientation of the light and the distance between the objective lens and the surface. Highly angled orientations cannot be accurately measured. Macro, non-linear shapes (curves) can be removed by filtering. However, if the surface angle cannot be brought into focus due to the accessibility of the surface or distance, the measurement cannot be made. In other words, to optically measure roughness, you pretty much have to be oriented directly over and be relatively close to the surface. In the example of Figure 3, this was not a problem and a direct measurement of the bearing race was successfully taken.
Now, think about measuring a tooth flank of a gear. Positioned near the top land of a gear flank, an optical profilometer cannot focus down the length of the flank into the root fillet area. The lens is too large to fit between the teeth and the angle is too great to be able to focus.
The solution to this problem is to either cut out a tooth or cast a reproduction of the tooth. Either will allow for optical roughness measurement. Cutting out a tooth can be OK for research, but not for quality control in a production environment. Castings have been proven to be repeatable and reproducible. [2] However, castings are time-consuming and require operator skill. Moreover, castings of large gear teeth, such as for wind turbine gears pictured in Figure 5, require specialized techniques.
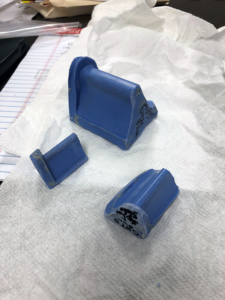
Figure 5: Large tooth castings for roughness measurement. (Courtesy: REM Surface Engineering)
Consequently, optical profilometers are not suitable for gear production environments. The lenses are large and delicate, the sample stages are sensitive to vibration and the area and sample must be very clean for the optics to focus properly. Even though they can scan a surface quickly, it takes time to make a reproduction casting and to set up the instrument. A tooth of approximately 10 millimeters in face width and five millimeters in tooth height can take only three to eight minutes to scan. But, the instrument set-up can take 15 to 20 minutes and the casting of the tooth can take an hour or more. For the quality control of production gears, optical profilometry based on tooth castings is not suitable to contact stylus profilometry.
But, what about the second reason? A great advantage of optical profilometry is that it can measure surfaces in three dimensions, resulting in far greater roughness details. Could gear performance be improved with three–dimensional roughness information? I believe yes, just not yet.
Conclusion
Gear formulas and guidelines have been based on two-dimensional roughness data, specifically Ra and Rq, for many years. However, I regularly cite Rmr as a key performance indicator of surface capacity of tooth flanks, even though it is not used in gear equations. ISO 25178-2 defines Smr along the same lines as its two-dimensional counterpart, Rmr. I believe roughness measurement of a contact zone area via Smr could become an important metric in the future for predicting flank loading capacity. To achieve this, two goals will need to be met:
One, research institutions will need to study the loading capacity performance of flanks based on contact zone area roughness measurements. Results will have to prove an improvement in predicting gear performance.
Two, the profilometer industry will need to develop an objective lens that can fit into tooth spaces. This will allow for direct flank optical roughness measurement, at least down to relatively small tooth spacing. Gear contact stylus probes exist for just this reason.
If these two areas can be successfully developed, I predict optical profilometry will become an important tool for predicting gear performance.
References
- https://www.mri.psu.edu/materials-characterization-lab/characterization-techniques/optical-microscopy
- M. Wagoner et al., “A Comparison of Surface Roughness Measurement Methods for Gear Tooth Working Surfaces.” 19FTM21, October 2019, AGMA Fall Technical Meeting, Detroit, Michigan.
- Y. Peng et al., “Areal Evaluation of Involute Gear Flanks with Three-Dimensional Surface Data.” 17FTM08, AGMA Fall Technical Meeting.
About the Author
Download Resource
Please fill out the information below to receive the selected resource.