Gear Corrosion During the Manufacturing Process
By : Gary Sroka ,

By : Gary Sroka ,
Omer El- Saeed and Gary Sroka, REM Chemicals, Inc. and Gregory Blake
No matter how well gears are designed and manufactured, gear corrosion can occur that may easily result in catastrophic failure. Since corrosion is sporadic and a rare event and often difficult to observe in the root fillet region or in finely pitched gears with normal visual inspection, it may easily go undetected. This paper presents the results of an incident that occurred in a gear manufacturing facility several years ago that resulted in pitting corrosion and intergranular attack (IGA). It showed that superfinishing can mitigate the damaging effects of IGA and pitting corrosion, and suggests that the superfinishing process is a superior repair method for corrosion pitting versus the current practice of glass beading.
Pitting corrosion
Pitting is one of the most insidious forms of corrosion; it can cause failure by perforation while producing only a small weight loss on the metal. Also, pits are generally small and often remain undetected. A small number of isolated pits on a generally uncorroded surface are easily overlooked
Surface pitting is often barely visible even at 10 – 30 X magnification, and can therefore often go undetected. The corroded region below the surface can be much larger than indicated by the surface area of the pit. ASTM G46– 94, Standard Guide for Examination and Evaluation of Pitting Corrosion, states: “Pits may have various sizes and shapes. A visual examination of the metal surface may show a round, elongated, or irregular opening, but it seldom provides an accurate indication of corrosion be- neath the surface. Thus, it is often necessary to cross section the pit to see its actual shape and to determine its true depth.” [2] For example, the G46 standard presents a chart of possible variations in the cross– sectional shapes of corrosion pits. See figure 1.
Consequently, only one insignificantly appearing narrow pit could ultimately lead to bending fatigue failure.
Crevice corrosion
Crevice corrosion is a localized form of corrosion that occurs in narrow openings or spaces where the localized chemical environment is different than that of its surroundings. The change in the crevice chemical environment can be caused by a depletion of the inhibitor or the oxygen, a shift to acid conditions or a build up of aggressive ion species in the crevice. Crevice corrosion commonly occurs under washers, seals, threads and surface deposits. When the chemical environment within the crevice is different than that of its surroundings, an electro- chemical cell is created resulting in corrosion that can be as damaging as pitting corrosion.
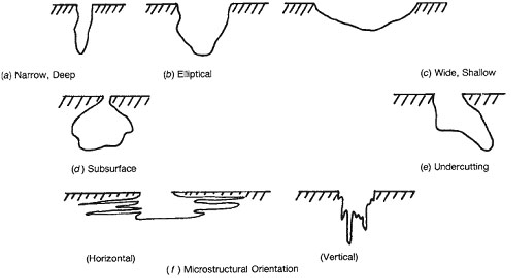 Figure 1. Variations in cross- sectional shapes of corrosion pits [2]
Intergranular corrosion
Another type of corrosion attack is intergranular or intercrystalline corrosion, during which a small volume of metal is preferentially removed from paths that follow the structural dissimilarities along grain boundaries to produce fissures or cracks. The same kind of subsurface fissures can be produced by transgranular or transcrystalline corrosion. In this a small volume of metal is removed in preferential paths that proceed across or through the grains. Intergranular and transgranular corrosion some- times are accelerated by tensile stress. In extreme case the cracks proceed entirely through the metal, causing rupture or perforation. This condition is known as stress corrosion cracking (SCC). [3]
Nguyen et al.[4], in an earlier paper discussed why gears are very susceptible to corrosion during the manufacturing process. In order to protect workers and the environment, the use of oil– based rust preventives and rust– inhibiting machining coolants have been minimized. The gear manufacturing process is complex, and requires machining, platting, carburization, grinding, plating removal, and nital etch inspection often followed by glass beading or shot peening. During this entire process, gears are often left exposed to the environment for several weeks without the use of rust preventives. They are handled by a number of personnel, and experience many back and forth trips between the shop floor and the metrology laboratory.
Aerospace gears require state– of– the– art design and precision manufacturing to meet the needs of today’s performance demands. Having said that, all of the efforts can be for naught if pitting and intergranular corrosion occur. Such corrosion can lead to disastrous, premature failure. The severity of the problem will be illustrated with two actual experiences described in detail in Part I and Part II of this paper. Part I is a short experiment to answer the question whether or not one drop of sweat inadvertently falling on an aerospace gear could result in serious damage. Part II discusses a study of IGA and pitting corrosion that was detected on aerospace gears, and the ability of superfinishing to remove this damage.
Introduction
Recently, the Aerospace Research Bloc at the Gear Research Institute of The Pennsylvania State University conducted a study of bending fatigue performance of AMS 6308 test gears.1) (AMS 6308 is commercially available as Carpenter’s Pyrowear® 53 and Latrobe’s Lesco 53.) Several gears experienced unexpected low cycle bending fatigue failure, and the root cause was determined to be corrosion pits in the root fillet region. The disturbing part of this finding is that the pitting was not visible to the naked eye, and could only be seen at 30X magnification. Consequently, these pits escaped the manufacturer’s as well as the testing laboratory’s inspections.
Since aerospace gears lack rust preventives during portions of the manufacturing cycle, one might question whether or not one drop of sweat inadvertently falling on a gear could cause major corrosion problems leading to premature bending fatigue failure.
Test procedure
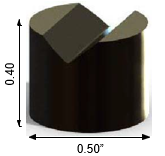
Test specimens: Because of their ready availability, Falex AMS 6260 (E– 9310) Steel V– Blocks (Part #000– 502– 024) having a 58– 60 HRC were chosen as test specimens. These were cleaned of their rust preventive using a non–chlorinated solvent (carburetor cleaner) followed by acetone as recommended by Falex. A drawing of the V– Block is shown in Figure 2.
One of the V– Blocks was left in the ground (as–received) condition. See Table 1 for the surface roughness values of the ground V– Block, and Figure 3 for the surface profile.
| Surface parameter | min |
| Ra | 7.6 |
| Rz | 54.1 |
| Rmax | 58.4 |
Another V– Block was superfinished. See Table 2 for the surface roughness values of the superfinished V– Block, and Figure 4 for the surface profile.
| Surface parameter | min |
| Ra | 3.1 |
| Rz | 23.0 |
| Rmax | 28.5 |
| View 1 | View 2 | View 3 |
 |
 |
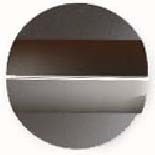 |
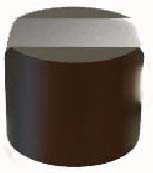
Figure 2. Drawings of Falex V- Block showing three different views
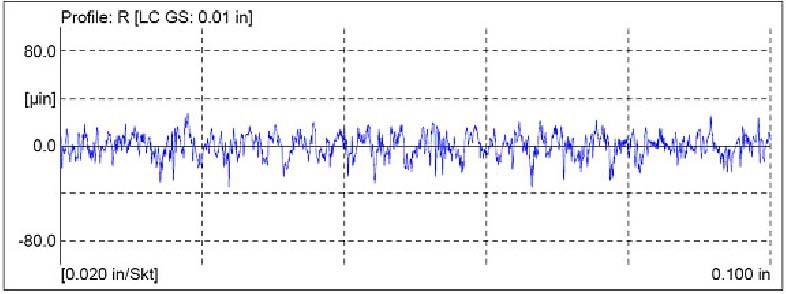 Figure 3. Surface profile of the ground V- Block
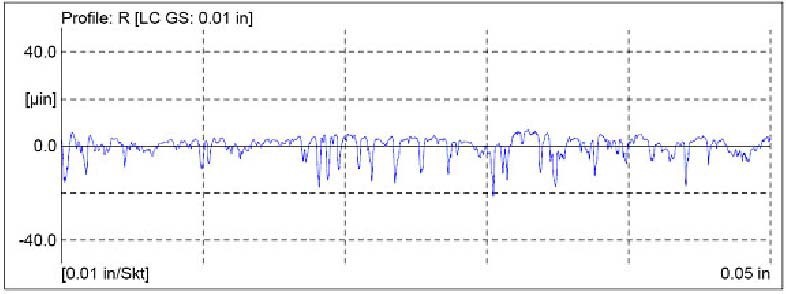 Figure 4. Surface profile of the superfinished Falex V- Block
The process used to superfinish the V– Block was chemically accelerated vibratory finishing, and has been described in detail elsewhere. [5] [6] A brief description of the process follows.
The superfinishing process
The unique and significant feature of the process is the surface leveling/smoothing mechanism utilized to achieve the surface finish. A reactive chemistry is used in the vibratory machine in conjunction with the media. When introduced into the machine, this chemistry produces a stable, soft conversion coating across the asperities (peaks and valleys) of the gears. The rubbing motion across the gears developed by the machine and media effectively wipes the soft conversion coating off the “peaks” of the gear’s surfaces, thereby removing a micro– layer of metal. The “valleys” are left untouched since the media bridges over them and cannot wipe the conversion coating. The conversion coating is continually re–formed and wiped off during this stage, producing a surface leveling/smoothing mechanism. This mechanism is continued in the vibratory machine until the surfaces of the gears are free of asperities. At this point, the reactive chemistry is rinsed from the machine with a neutral soap. The conversion coating is wiped off the gears one final time to produce the mirror– like surface.
Artificial sweat
ISO 3160– 2 gives a formula for artificial sweat. It consists of 20 g/L sodium chloride (NaCl), 17.5 g/L ammonium chloride (NH4Cl), 5 g/L urea 5 g/L (NH2CONH2), 5 g/L acetic acid (CH3COOH) and 15 g/L racemic lactic acid (CH3CH(OH)COOH) with the pH adjusted to 4.7 by NaOH.
Procedure
One drop of artificial sweat was placed on the test region of a superfinished and an ground V– Block. The specimens were then allowed to set in an air conditioned office exposed to the atmosphere, and were examined as time progressed.
Results
Surprisingly, serious corrosion was observed in only 1.5 hours. After 2.3 hours the artificial sweat appeared dried, and a heterogeneous deposit was observed on each specimen giving the impression that conditions were ripe for crevice corrosion attack. See Figure 5.
After 127 hours, heavy corrosion products were observed on the surface of the V– Block specimens. The layer appeared thicker on the ground versus the superfinished surface. See Figure 6.
This layer was mechanically removed; the V– Block was polished with 1500– grit paper to remove the greater part of the corrosion deposits. The surface was then cleaned with #0000 steel wool followed by ultrasonic cleaning in a mild caustic cleaning solu- tion. Pitting corrosion, crevice corrosion, and IGA were observed on both the superfinished surface and ground surface. See Figures 7 and 8.
Conclusion
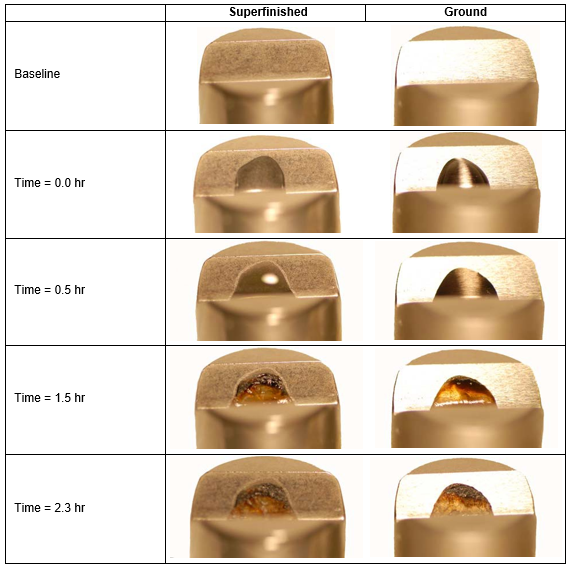 Figure 5. View 2 – Photographs of a superfinished (L) and ground V- Block (R) with one drop of artificial sweat deposited on the surface
 Figure 6. View 2 – Photograph of the superfinished (L) and ground V- Block (R) Surface after 127 hours
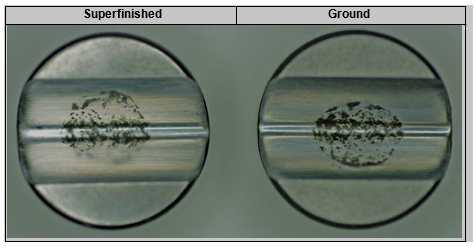 Figure 7. View 3 – Superfinished (L) and ground (R) after mechanical cleaning, showing residual corrosion
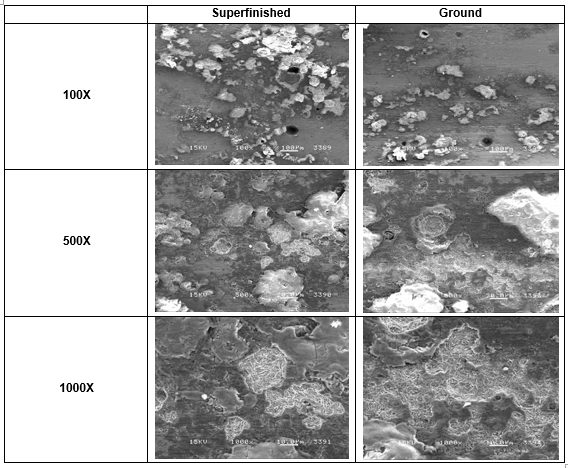 Figure 8. SEM images of test specimens after mechanical cleaning. Superfinished (L) and ground (R). Deep pits are visible in the 100X images. The white deposits cover shallower pits. IGA cracks are visible in the 1000X images.
Part II: IGA and pitting corrosion during Manufacturing.
In 2000, Rolls– Royce Corporation sent used/scrap carburized AISI 9310 gasifier train gearshafts to REM Chemicals, Inc. for edge radiusing. See Figure 9. Initial inspection revealed light contact damage on the gear flanks.
The gearshaft was superfinished using chemically accelerated vibratory finishing, as described elsewhere.[5] [6] See Figure 10.
The superfinished gears were subjected to a rigorous inspection upon return to Rolls– Royce. Initially, it was assumed that the damage was caused by the superfinishing process, since it is carried out in a very weak acidic medium. REM conducted their own inspection at a metallurgical laboratory (Anderson & Associates, Houston, TX); the gear was sectioned, polished, and examined. IGA was detected, confirming Rolls– Royce’s initial findings. Light contact fatigue damage was also detected by the laboratory. Figure 11 shows the sections and the target inspection areas. Photomicrographs of the various areas are shown in Figures 12– 16.
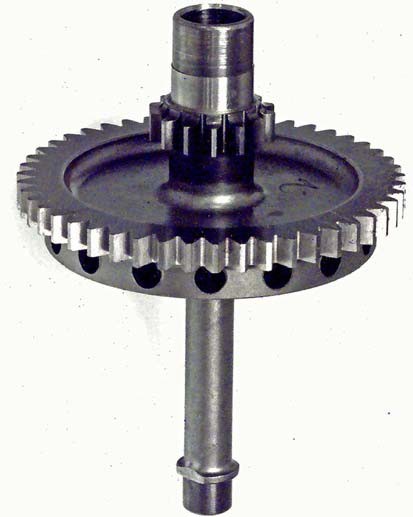 Figure 9. As received used/scrap carburized AISI 9310 gasifier train gearshaft
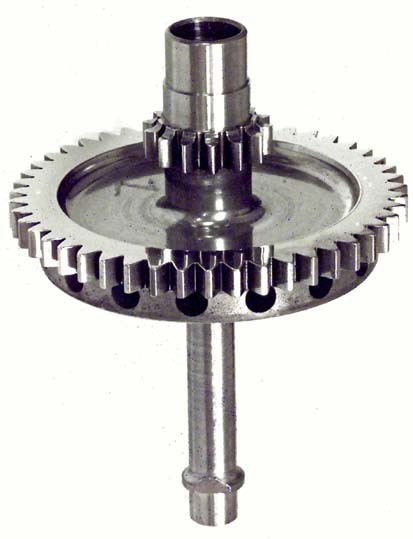 Figure 10. Superfinished used/scrap carburized AISI 9310 gasifier train gearshaft
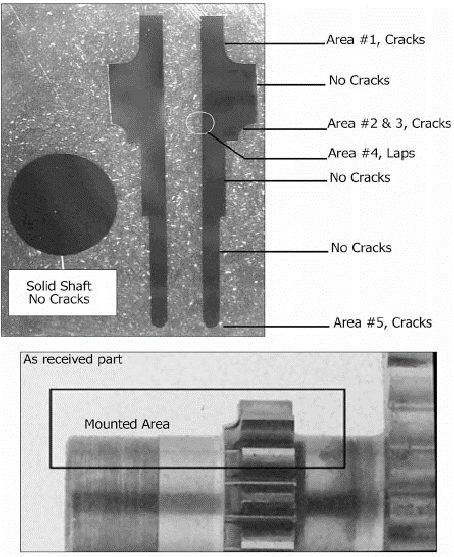 Figure 11. Locations of IGA and contact damage on gearshaft sections (Top) taken from the gearshaft (Bottom)
In order to demonstrate that the superfinishing process did not cause IGA, a Falex 9310 V– Block was superfinished under the same conditions as the AISI 9310 gearshaft. The V– Block was sectioned, polished and the V– area was examined. The photomicrographs showed no IGA or pitting. See Figure 17. This definitively confirmed that superfinishing does not induce IGA.
Once it was proven the superfinishing process does not induce IGA or pitting on AISI 9310, Rolls– Royce then questioned whether it would remove the IGA or exacerbate the problem by deepening the cracks. The reason for the latter question stems from the acidic chemicals used in the superfinishing process. In this process, the refinement chemistry creates a coating on the gears that is continuously wiped off by the media. However, the media only removes the peaks leaving the valleys of the metal surface untouched. Metallurgists often expressed concerns that the acidic chemistry had the potential to cause corrosion in the valleys of the metal surface. This was a reasonable concern, eight years ago, when the superfinishing process was being introduced to the aerospace gear industry.
To investigate this concern, Rolls– Royce provided REM Chemicals, Inc. with another gearshaft that had IGA for further evaluation. See Figure 18.
The gearshaft was sectioned, polished, and examined. SEM images confirmed the presence of IGA. See Figure 19. The maximum nominal depth of the IGA was 0.0002”.
The gearshaft was then superfinished such that approximately 0.0002” of metal stock was removed. It was then sectioned, polished, and examined for the final inspection. The SEM image clearly shows that the layer containing the IGA was completely removed. See Figure 20. The surface at 5000X shows that it is extremely smooth. This proved that the superfinishing process is not only metallurgically safe, but is also capable of repairing damaged surfaces. However, the depth of the damage must not exceed the metrological tolerance limits of the gear teeth.
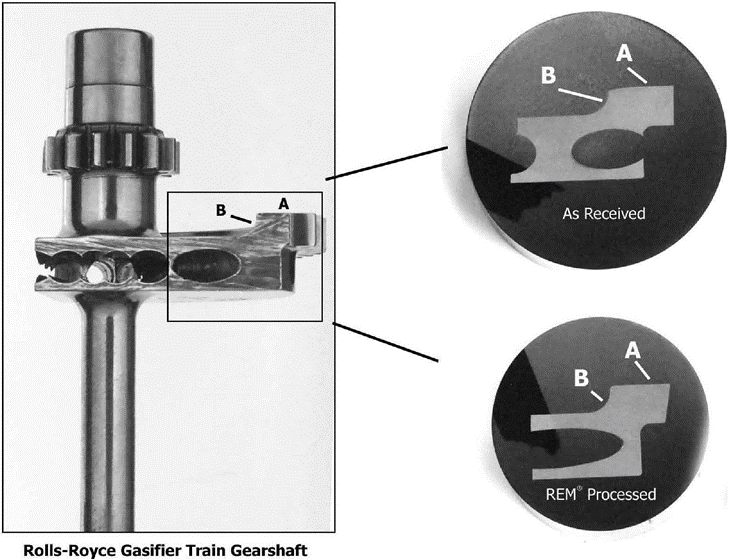 Figure 18. Cross section of gearshaft studied to determine the effect of superfinishing on IGA. IGA was detected on areas A & B
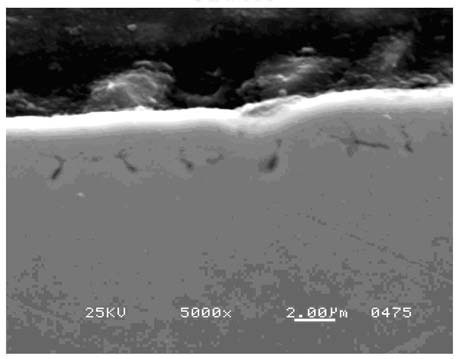 Figure 19. SEM at 5000X magnification, showing the presence of IGA. Circle shows a typical IGA crack on areas A & B. The nominal IGA depth is 0.0002”
Conclusions:
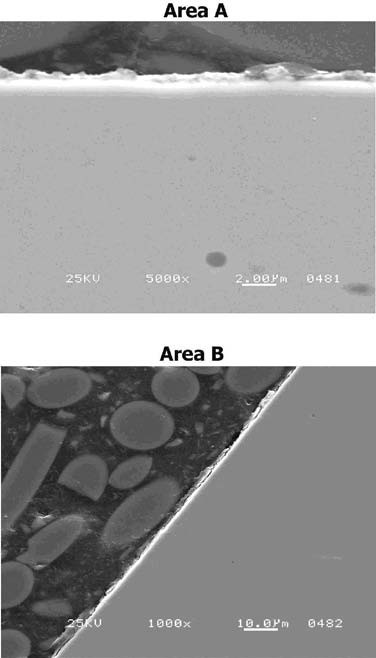 Figure 20. SEM images of Areas A and area B showing that superfinishing removed the IGA
References
Please fill out the information below to receive the selected resource.
Please fill out the information below to receive the selected resource.