Introduction:
Pitting fatigue and wear account for approximately 66% of gearbox failures. Numerous technologies have been developed to increase the service life of gears such as new designs, steel alloys, machining techniques, metallurgical treatments, and surface finishing techniques. Still, gear manufacturers are being driven to achieve not only increased cycle life, but also to do so at ever-higher operating loads. This paper, based on a patented commercial ®1 technology known as the REM Process, predicts that chemically accelerated vibratory finishing using non-abrasive media is capable of meeting the performance goals of gear manufacturers by producing Isotropic Superfinished (ISF) gears. Rolling/Sliding Contact Fatigue (R/SCF) testing predicts performance improvements of 16-fold in cycle life while at increasing operating loads (12.5%) without the re-engineering of existing gear systems.
In this paper, “ISF” will refer to a surface that exhibits a non-directional pattern having approximately a roughness average (Ra) of 1.5 μin. produced by chemically accelerated vibratory finishing using non-abrasive media1
1) Surface Finishing of Gears. High strength gears are traditionally finished by mechanical methods such as shaving, grinding, honing or lapping. These are processes that often result in combinations of poor metal-to- metal contact surface properties, metallurgical damage, and tooth geometry errors. No matter how carefully performed, the resulting surfaces exhibit sharp rows of parallel or crosshatched asperities (peaks and valleys). It has been shown2,3,4,5,6 that sharp parallel asperities can result in boundary lubrication conditions where significant metal-to-metal contact occurs. These contacts initiate wear and contact fatigue pitting. ISF allows development of full elastohydro-dynamic lubrication (EHL) where complete metal-to-metal separation is achieved. The authors believe it is this separation that results in the virtual elimination of wear and contact fatigue found in the Rolling/Sliding Contact Fatigue (R/SCF) test results presented here.
Recent research has sought to reduce the contact fatigue of gears by various surface treatments. These include CBN precision7 grinding , “Abral” (vibratory abrasive superfinishing) processing4,5,8,9,10, barreling (tumbling abrasive polishing) of shot peened gears11, and other techniques. Data from studies of the “Abral” process will be compared to ISF.
The “Abral” process is a proprietary process where the parts are immersed in an abrasive mixture consisting of water, aluminum oxide powder and small zinc chips. The parts are typically vibrated through three successively finer mixtures of aluminum oxide powder until a mirror-like finish is achieved. On carburized ground gears processing cycles can be as long as 15-20 hours. An Ra as low as 1.7 μin. has been reported on gears. Its application to gears has been studied in depth4,5,8,9,10, where it has been shown that the surface it produces approaches a full EHL mode of lubrication, and thus reduces friction, bulk temperature and pitting fatigue.
Since the “Abral” process holds promise for increasing the service life of gears, it seems logical to also investigate ISF since it has several advantages over the “Abral” process:
- Ultimate Possible Surface Finish: Ra <1.0 μin.
- Speed: Typical ISF process on carburized ground gears is 2.0 hours.
- Undulations: Reduces waviness pattern caused by machining since media is large enough to bridge neighboring peaks.
- Commercially Viable: A robust process that has been commercially used to finish various metal articles for over 15 years.
2) Advantages of ISF from Previous Studies. In addition to the above advantages, related ISF studies have shown performance benefits regarding parasitic friction and operating temperature reductions, which are closely related to wear and contact fatigue. Two examples are given below.
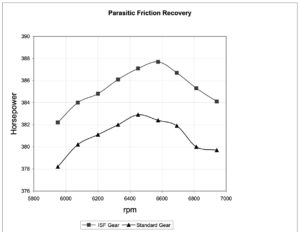
Dynamometer testing was used to measure the effect of ISF on horsepower. A pair of T101 transmissions (Winston Cup Auto Racing) was used as the test articles. Third gear was selected for the comparison tests. One transmission had standard ground gears while the other had ISF components. The tests were carried out in sequence on the same dynamometer test stand with the same engine. During each test, the engine and transmission were preheated by idling until the transmission oil (Unocal 90W) reached 180° F. The engine was then cooled back down to normal operating temperature before running with the applied load to measure horsepower losses through the transmission. Drive shaft angles were monitored to ensure a consistent angle was maintained for all runs. Figure 1 shows that approximately 1.0% in horsepower was recovered with ISF transmission components.
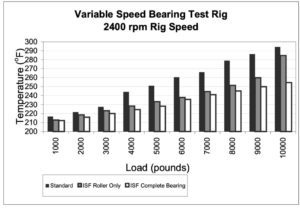
In another study, the effect of ISF on the operating temperature of spherical roller bearings and assemblies was evaluated. Testing was conducted on a Variable Speed Spherical Roller Bearing (SRB) Test Rig in a Mobil DTE Extra Heavy Oil bath. Two bearings were ISF, one having just the rollers ISF and the other with both the rings and rollers ISF. The baseline was a standard production honed bearing. Steps were taken to ensure that internal clearance was not a variable in the comparison. The procedure consisted of running each bearing at 2400 rpm and allowing them to heat stabilize at radial loads from zero to 10,000 pounds. After stabilization the bearing temperature was recorded, and the load was then increased by 1000 pounds. Figure 2 shows that ISF bearings and assemblies reduces the operating temperature at varying loads by as much as 40° F.
3) INFAC/REM Collaboration: These advantages led IIT Research Institute, Instrumented Factory for Gears (INFAC) to invite REM Chemicals, Inc. to participate in their surface enhancement study by preparing ISF specimens and load rollers. REM Chemicals, Inc. was not the primary investigator in the Rolling/Sliding Contact Fatigue (R/SCF) study presented here, but has been granted permission to release the R/SCF data12,13
Description of ISF Process:
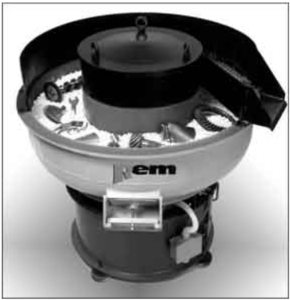
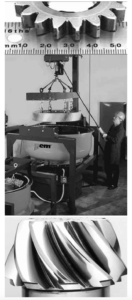
1) Vibratory Machines. Chemically accelerated vibratory finishing is carried out in vibratory finishing bowls or tubs (See Figure 3.). These durable machines are basically unchanged in design since their inception over forty years ago. The authors are familiar with one vibratory finishing bowl still in operation with over 100,000 hours of use. Vibratory finishing machines are available in sizes from 0.5 to 250 cubic feet of working capacity. This means gears can be finished ranging in size from less than two inches in diameter to over four feet in diameter (See Figure 4.) and quantities from one to thousands at a time.
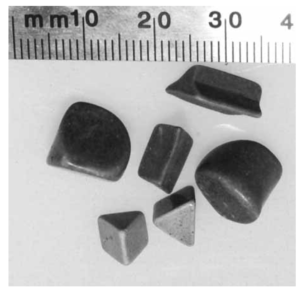
2) High Density, Non-Abrasive Ceramic Media. The ISF process utilizes high density, non-abrasive ceramic media1 in the vibratory finishing machine. This media alone is unable to abrade material from the surface of the metal part(s) being processed. The media is selected from a range of shapes and sizes best suited for the geometry of the part(s) (See Figure 5.). In finishing gears, attention is given to selecting the media with regards to the total gear tooth geometry. No finishing occurs where media is unable to contact or rub a surface of a gear. By selecting a media that has a uniform probability of contact across all surfaces, especially across the tooth flanks, the tooth profile and lead are not adversely affected, even with AGMA Q12 gears. (See the following section on Metrology). One important advantage of the high-density ceramic media is that it has essentially no attrition during usage. Thus, the ISF process is consistent for thousands of hours of production.
3) Process Chemistry. The unique and significant feature of ISF is the surface leveling mechanism utilized to achieve the surface finish. A proprietary chemistry is used in the vibratory machine in conjunction with the media. When introduced into the machine, this chemistry produces a stable, soft conversion coating across the asperities (peaks and valleys) of the metal part(s). The rubbing motion across the part(s) developed by the machine and media effectively wipes the conversion coating off the “peaks” of the part’s surfaces, but leaves the “valleys” untouched. The conversion coating is continually reformed and wiped off during this stage producing a surface leveling mechanism. This mechanism is continued in the vibratory machine until the surfaces of the part(s) are free of asperities. At this point, the proprietary chemistry is rinsed from the machine with a neutral soap. The conversion coating is wiped off the part(s) one final time to produce ISF gears.
This unique mechanism has been developed for many different types of metals. Along with steels, commercial applications exist for titanium, nickel/chrome, stainless steel, copper (and copper alloys), zinc and aluminum. However, it is with hardened steels that ISF has reached its greatest utilization.
ISF can consistently and rapidly level steel surfaces irrespective of the part’s material hardness. The speed of leveling is dependent on the conversion coating formation rate. Hardened steel parts, such as carburized gears, actually level fastest since the conversion coatings develop quickest on high carbon containing surfaces. Since the process is carried out in rust inhibited water-based chemistry at ambient temperature, there is no possibility of high temperature metallurgical degradation to gears that is common with mechanical grinding or honing operations. Taking advantage of these high hardness finishing abilities often allows the manufacturer to eliminate multiple machining operations such as honing, deburring, and edge break – an often inconsistent “hand” operation. Thus, by eliminating traditional mechanical finishing steps, ISF can result in an overall reduction in manufacturing costs while achieving a more consistent gear with higher performance characteristics.
4) Health, Safety and Environmental Considerations. The chemicals used to produce the ISF specimens cited in this paper are non-toxic and are classified as non- hazardous by 49CFR (Federal Hazardous Material Transportation Law). Such products have been supplied to a wide variety of industries for over 15 years without any health or safety incident.
The waste produced by the ISF process is classified as non-hazardous according to the EPA, but may require standard metals precipitation to meet local and state discharge regulations.
Metallurgically Safe:
With chemically based processes that are applied to hardened steels, there is always a concern of metallurgical degradation. ISF removes surface imperfections non-aggressively and in a controlled manner that does not cause metallurgical damage typical of conventional mechanical surface finishing techniques. But more specifically, does ISF cause chemical degradation such as intergranular attack (IGA) or hydrogen embrittlement? It is shown here that the process used here does not reduce the strength of hardened carburized gears.
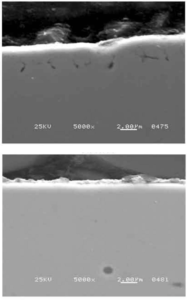
1) Intergranular Attack (IGA). An aerospace quality AMS 6265 (SAE 9310H) gear exhibiting IGA was obtained from an aerospace gear manufacturer. These gears were carburized and hardened, but were not final ground. The gear was sectioned into two parts. One part was ISF to the typical isotropic asperity free condition while the other was left in the as received and microcracked condition. The parts were cross-sectioned, mounted and polished. These specimens were then analyzed by photomicroscopy and scanning electron microscopy (SEM). The SEM image in Figure 6 clearly shows that the amount of surface metal removed in this test was equivalent to the depth of the cracks. It was concluded that ISF did not cause existing cracks to propagate deeper.
2) Hydrogen Embrittlement. Slow strain rate testing (ASTM G129 and ISO 7539) was used to detect hydrogen embrittlement of ISF processed AISI 8620 and AMS 6265 (SAE 9310H) case carburized test specimens.
The test specimens had nominal gage dimensions of 0.150-inch diameter by 1.0-inch length. These were hardened to an effective case depth of 0.030 inch with a surface hardness of 58-59 HRC. All tests were conducted in air at 75° F at an initial strain rate of 4 x 10⁻⁶ sec-1.
The specimens were ISF for 4.0 hours (approximately two times longer than needed on aerospace gears or the Rolling/Sliding Contact Fatigue (R/SCF) specimens utilized in the following section of this paper.) This was done to ensure the specimens had adequate time for hydrogen, if any, to migrate into the metal. All specimens were immediately placed on dry ice after processing and maintained as such until testing. Baseline specimens were generated by a bake out process at 400° F for one hour.
Since all specimens failed in the elastic region of the stress-strain curve, elongation and reduction area measurements were not taken into account in the analysis of data. Only the ultimate tensile strength (UTS) parameter was employed to gage the performance of the materials. Table 1 presents summaries of these results.
Metrology:
ISF is a controlled technology that can uniformly remove metal from gears while maintaining the tooth profile and lead within tolerance. Commercial processing of AGMA Q12 gears has been underway for more than two years. ISF typically removes slightly more material from the addendum where the media has a higher probability of contact compared to the dedendum. A careful choice of media can minimize this difference.
1) Example of Material Removal. For a 12 to 14 μin. Ra ground tooth finish (i.e., Rmax ≈ 125 μin.), less than 0.000125 inch (125 μin.) of material needs to be removed from the pitch point to ensure an asperity-free surface. Therefore, an AGMA Q12 gear can be held within tolerance. The processing time for this amount of metal removal is approximately two hours.

Table 1: Slow strain rate test results. Testing performed in triplicate.
The results show that ISF does not induce hydrogen embrittlement in AISI 8620 or AMS 6265 (SAE 9310H) case carburized test specimens. F Test14 analysis of the UTS standard deviations listed in Table 1 shows that none of the sample sets are statistically different.
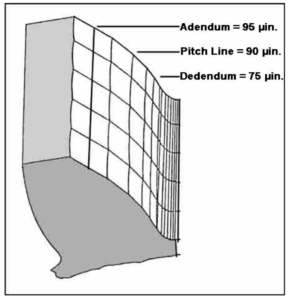
Figure 7 shows the typical amount of metal removed from the contact surface of an AISI 8620 carburized steel, 17-tooth gear, 8 DP, 25º pressure angle, and fillet radius of approximately 0.050 inch with approximately one hour of ISF.
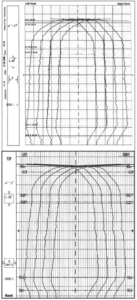
2) Gear Tooth Profile. Figure 8 shows before and after ISF profiles of an aerospace quality AGMA Q12 carburized steel gear. The tooth profiles were measured on the same gear at the same locations before and after. The test gear was 54-tooth, 8 DP, 7 inch O.D., 1.9 inch face width, and hardness of approximately 60 HRC. The as received gear had a starting Ra of 15 to 16 μin. After ISF, the gear had an Ra of 1.7 μin.
Final analysis of the tooth profile change was accepted by the aerospace manufacturer as within AGMA Q12 tolerances. The profile change was in the range of 0.0001 in.
Virtual Elimination of Wear and Pitting:
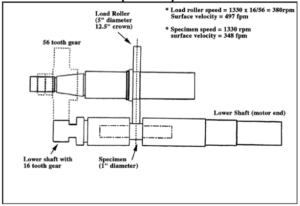
1) Description of Test. Rolling/Sliding Contact Fatigue (R/SCF) testing was conducted under supervision of IIT Research Institute, Instrumented Factory for Gears (INFAC) and performed by the Gear Research Institute (GRI) using their R/SCF test equipment13. This test rig simulates the R/SCF experienced by a gear with the benefit of being able to adjust the operating speed, sliding ratio, contact stress load, lubricant temperature, lubricant flow and lubricant type. It has been widely used in industry for predicting wear and contact fatigue performance of gears for many years. Figure 9 shows a schematic diagram of the test apparatus with the load roller and specimen mounted in contact, as they would be during testing.
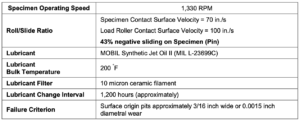
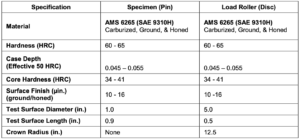
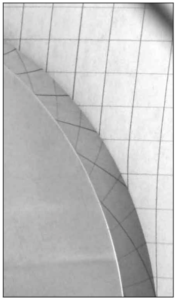
The testing parameters for wear and contact pitting are given together in Table 2 since they were run concurrently. A detailed description of the load roller and specimen is given in Table 3. An image of an ISF load roller can be found in Figure 10. The sliding ratio of 43% negative on the specimen is designed to be higher than that experienced by a typical gear in the dedendum area. This is done to facilitate a failure without having to run extremely long cycles.
All specimens and load rollers were previously normalized, quenched, tempered, finish machined with 0.008 inch grind stock per side, carburized, sub critical annealed, copper plated 0.001-0.002 inches per side, hardened, cold treated, tempered, copper stripped, ground, honed, surface temper etch inspected, and magnetic particle inspected. See Table 3 for details.
Figure 10 shows photographs of an actual ISF load roller (disc) with a mirror-like surface and an Ra < 1.5 μin. Note the reflection of the grid lines from the graph paper under the load roller.
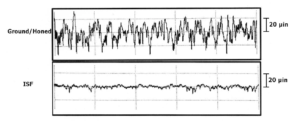
Profilometer tracings of a ground/honed (Ra = 10.0 μin.) and ISF (Ra < 1.5 μin.) specimen surfaces are shown in Figure 11. The trace length is 0.06 inches with a gaussian filter of 0.01 inch. The vertical scale is at 20 μin. per division for both tracings.
The contact surface of a ground/honed specimen and an ISF specimen were analyzed by scanning electron microscopy (SEM). Figure 12 shows the images of the surfaces at 1000X magnification. Note that the rows of directional asperities have been completely removed leaving a flat surface in its place. Also note the appearance of mechanical shearing damage from honing that is evident on the ground/honed specimen. This has been completely removed by the ISF process.
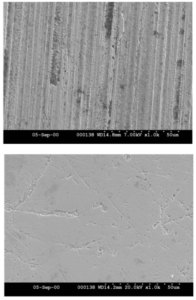
Figure 12: Scanning electron micrograph (1000X) of a ground/honed specimen (top) and an ISF surface (bottom) after processing.
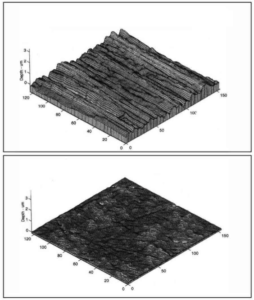
The 3-D topography of a typical ground surface and an ISF surface are compared in Figure 13. Note that the rows of parallel asperities have been completely removed, leaving a flat isotropic surface in its place.
2) Virtual Elimination of Wear: Rolling/Sliding Contact Fatigue (R/SCF) testing by INFAC at GRI shows the virtual elimination of wear due to the ISF surface of the specimen and load roller13. In this test, run concurrently with the contact fatigue testing, the specimen and load roller are placed in the R/SCF test equipment (See Figure 9.), brought up to temperature with the oil flowing to the contact surface and run through a gentle break-in cycle at lower contact stress loads. The test rig is then stopped, and the diameter of the specimen is measured at the contact point while hot. The contact stress is then increased to the desired load and the cycle count started. The test surface of the specimen is periodically measured for wear throughout the run with the final measurement taken after failure on a non- pitted section. The difference between the starting and final measurements represents the overall wear.
The average wear rate generated during the R/SCF testing for the ground/honed specimens was 82 μin./million cycles at 400 ksi. The average wear rate for the ISF specimens was only 5 μin./million cycles where the load was sequentially increased from 400 to 425 to 450 ksi. This is an average of 16 to 1 reduction in wear on the ISF specimens as compared to the ground/honed baseline even with increasing loads. This type of wear performance has also been demonstrated with Falex 2Block-on-Ring (ASTM D2714 and D2782) testing2.
3) Virtual Elimination of Pitting: The Rolling/Sliding Contact Fatigue (R/SCF) results, obtained by INFAC at GRI, listed in Table 4 show the virtual elimination of contact pitting fatigue by ISF as stated earlier13. In this test the specimens are placed in the R/SCF test equipment, brought up to temperature with the oil flowing to the contact surface and run through a gentle break-in cycle at lower contact stress loads. The contact stress is then increased to the desired load and the cycle count started. These tests are run with periodic stops to measure for dimensional wear as mentioned previously. The testing is continued until one of the failure criterions is met. If failure is due to pitting, the test apparatus will automatically shut down due to the induced vibrations. If no failure is exhibited after a set number of cycles (run- out), the contact stress is increased and the cycle count starts over.
Figure 14 shows two tested R/SCF specimens. The top image is a ground/honed specimen that has failed due to pitting at 3.5 million cycles. The bottom image is an ISF specimen that has survived 20 million cycles at each of three increasing contact stress settings all the way up to the test rig’s load limit of 450 ksi without failure. Note that after 62 million cycles at increasing contact stress loads, the only effect to the specimen contact area is a slight discoloration, which is most likely due to an oxide residue from the lubricant. R/SCF results are listed in Table 4.
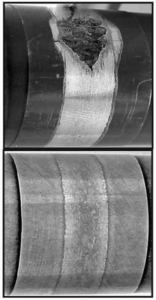
Figure 14: The top image shows a ground/honed specimen that has failed due to pitting at 3.5 million cycles at a load of 400 ksi The bottom image shows an ISF specimen that has survived 20 million cycles at each of three contact stress loading steps from 400 ksi up to the test rigs limit of 450 ksi without failure.
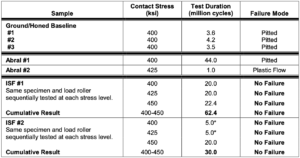
Table 4: Rolling/Sliding Contact Fatigue (R/SCF) Pitting Data.
* Based on the results of ISF #1 specimen, the cycles at 400 and 425 ksi were shortened to 5 million cycles to reduce testing time and costs.
The results of the R/SCF show:
- ISF specimen #1 survived a total of 62 million cycles at 400, 425 and 450 ksi. Therefore, it has a minimum cycle life at least 16 times that of the ground/honed specimens at 400 ksi.
- ISF specimen #1 survived a total of 42 million cycles at 425 and 450 ksi. Therefore, it has a minimum cycle life at least 42 times that of the “Abral”12 specimen at 425 ksi.
- ISF specimen #1 and specimen #2 each survived 20 million cycles at 450 ksi. Therefore, even at this 12.5% higher contact stress it has a minimum cycle life at least five times higher than the ground/honed specimen at 400 ksi.
Loss-of-Lubricant:
1) Test Conditions. In light of the Rolling/Sliding Contact Fatigue (R/SCF) results, it was decided to subject an ISF specimen to a Loss-of-Lubricant (L-O-L) test13. AISI 8620 specimens and load rollers were used in this test as the baseline since no ground/honed AMS 6265 (SAE 9310H) specimens and load rollers remained in inventory after the R/SCF testing described above. The same dilemma was faced with the ISF specimen and load roller as no untested parts remained. As a result, an “all ready tested but un-failed” ISF specimen and load roller were used for the L-O-L test. The authors believe the “already tested but un-failed” condition would simulate a “real world” situation where an operating gearbox is subjected to a L- O-L environment.
The AISI 8620 specimens used as a baseline were ground and carburized, but lacked a final surface grind. The authors expect that AISI 8620 and AMS 6265 (SAE 9310H) would have had similar L-O-L test results. The overall point is that ISF significantly improved the L-O- L-test results, more than material and grinding variations are likely to explain.
As in the R/SCF Test, specimens and load rollers were placed in the test equipment, brought up to operating temperature, and run through a break-in cycle with the oil flowing to the contact surface. The load was then increased to 400 ksi. At this point the oil was turned off and the timer started. The test parameters are given in Table 5.
2) Test Results. During this testing, the ISF specimen reached the 30-minute run-out time without failure at a contact stress load of 400 ksi. Without stopping the test, the load was increased to 425 ksi over a time of approximately 15 seconds and the timer started again. Table 6 lists the results of this testing.
The 30 plus minute survival rating for the ISF specimen is a significant result. It is a 30 times increase compared to the baseline specimen. More importantly, it represents a much sought after survivability criterion by the military that a helicopter can continue flying for a period of 30 minutes after the loss of the lubricant system in its gearbox. The authors know of no other example in which a 30-minute survival rating has been achieved under similar test conditions for AMS 6265 (SAE 9310H) material.
Discussion:
ISF produces high quality gears with increased service life and higher permissible power density. It is a commercially accepted mass finishing process in production throughout Europe and the USA. It can be used for gears made of any type of metal and in all quality ranges up to AGMA Q12. Studies are underway on gears of higher AGMA quality.
ISF can be tailored to fit any gear production facility manufacturing one or thousands of gears a day. It produces a consistent surface finish that significantly increases performance, and can reduce manufacturing costs through the elimination of traditional surface finishing steps.
Conclusions:
ISF using chemically accelerated vibratory finishing with non-abrasive media:
- uses chemicals that pose low health, safety and environmental concerns.
- removes the surface imperfections non- aggressively with a chemical/ mechanical action without the risk of metallurgical damage typical of con- ventional surface finishing techniques thereby reducing the number of final inspections needed.
- does not cause IGA or hydrogen embrittlement.
- is a controlled process that can uniformly remove metal from AGMA Q12 gears while keeping the gear tooth profile and lead within tolerance.
- has proven its ability to virtually eliminate wear by generating a surface with a final Ra < 1.5 μin. The specimens from the wear test show at least a 16- fold reduction in wear without failure as compared to the ground/honed specimens even at increased loading.
- produced Rolling/Sliding Contact Fatigue (R/SCF) specimens that did not fail after running sequentially at all three contact stress loadings (400, 425, and450 ksi.)
- produced R/SCF specimens that were capable of carrying 12.5% higher contact stresses than the ground/honed specimens without failure.
- produced R/SCF specimens with a minimum cycle life at least 16 times that of ground/honed specimens at 400 ksi.
- produced R/SCF specimens with a minimum cycle life at least 42 times that of “Abral”12 processed specimens at 425 ksi. This demonstrates that ISF imparts unique surface properties that enhance performance over and above that by purely abrasive super finishing processes
- produced an R/SCF specimen that survived a Loss-of-Lubricant condition in excess of 30 minutes at 400 ksi. This is an increase of over 30 times the cycle life of the unfinished ground/carburized specimens.
Areas of Future Research or Research Awaiting Publication:
- Single Tooth Bending Fatigue Testing of ISF gears versus traditionally finished gears.
- Noise reduction of gear sets by ISF.
- Maximum permissible power densities of ISF gears and increased timebetween maintenance.
- Temperature studies as related to thereduction of oil reservoir capacity and oil cooling systems due to ISF components in gearboxes or transmissions and the concomitant increases in fuel economy.
- Efficiency studies as related to reduction in parasitic friction from ISF components in gearboxes and transmissions and the concomitant increases in fuel economy.
- R/SCF testing with a redesigned load roller radius to increase the contact stress load and facilitate failures of ISF specimens.
Acknowledgements:
- The wear, pitting, and loss-of-lubricant testing was funded by the U.S. Army Aviation and Missile Command (AMCOM) through Instrumented Factory for Gears (INFAC) program at IIT Research Institute in association with Rolls–Royce and Boeing. The Gear Research Institute (GRI) at the Applied Research Laboratory of Pennsylvania State University conducted the testing for INFAC. Additional work in this area is in progress funded by AMCOM through the Power Transfer Systems Manufacturing (PTSM) program at IIT Research Institute.
- ISF was conducted by REM Chemicals, Inc., Brenham, Texas, who also sponsored the following studies:
- IGA and SEM imaging by Anderson & Associates, Houston, TX.
- Hydrogen Embrittlement using the Slow Strain Rate Method by InterCorr International, Inc., Houston, TX.
- Dynamometer testing for reductions in parasitic friction by Tex Racing Enterprises, Inc., Ether, North Carolina.
- SEM Images by Stork® Southwestern Laboratories, Houston, Texas.
References:
- Michaud M., U.S. Patent 4,818,333 (1989) “Metal Surface Refinement Using Dense Alumina-Based Media.”
- Nixon H.P., Cogdell J.D., Proc. SAE International; 1998 Earthmoving Industry Conference and Exposition Peoria, IL (1998) “Performance Evaluation of a potential New Engineered Surface for Enhanced Concentrated Tribological Contacts.”
- Zhou R.S., Hashimoto F.; Proc. ATLE/ASME Tribology Conference; Maui, HI (1994) “A New Rolling Contact Surface and “No-Run- In” Performance Bearings.”
- Patching M.J., Evans H.P., Snidle R.W., “Micro EHL Analysis of Ground and Superfinished Steel Discs Used to Simulate Gear Tooth Contacts”, Tribology Transactions, (1996) 36 595-602 ISSN 0569-8197.
- Britton R.D., Elcoate C.D., Alanou M.P., Evens H.P., Snidle R.W., Proc. STLE/ASME Tribology Conference; Orlando, Fl (1999) “Effect of Surface Finish on Gear Tooth Friction.”
- Hashimoto F.F.H., Zhou R.S., Howlett K., U.S. Patent 5,503,481 (1996) “Bearing Surfaces with Isotropic Finish,” (Assigned to REM Chemicals, Inc., Southington, CT.)
- Tanaka S., Ishibashi A., Ezoe S., 1984, “Appreciable Increases in Surface Durability of Gear Pairs With Mirror-Like Finish,” ASME Publication 84-DET-223, ASME, New York, NY.
- Snidle R.W., Evans H.P., Alanou M.P., (1997), “The Effect of Superfinishing on Gear Tooth Profile,” Final Report on US Navy Contract N68171-96-C-9043, Report No AD A327916 Defense Technology Information Center, Alexandra, Virginia, USA (1997) pp73.
- Krantz T.L., Alanou M.P., Evans H.P., Snidle R.W., 2000, “Surface Fatigue Lives of Case- Carburized Gears With an Improved Surface Finish,” NASA/TM-2000-210044.
- Patching M.J., Kweh C.C., Evens H.P., Snidle R.W., “Conditions for Scuffing Failure of Ground and Superfinished Steel Disks at high Sliding Speeds Using a Gas Turbine Engine Oil,” Trans ASME Journal of Tribology, Vol.117, July 1995, 482-489.
- Hoyashita S., Hashimoto M., Seto K., 1998, “Basic Studies on Fatigue Strength of Case- Hardened Gear Steel—Effects of Shot Peening and/or Barrelling Processed,” AGMA Publications 98FTM9.
- Manesh A., “Surface Enhancement for Increasing Load Bearing Density”, Proceedings of Defense Manufacturing Conference 2000, Foundation for Global Security, November 27-30, 2000, Tampa, Florida.
- Swiglo A. A., 2001, “Enhanced Surface Protection of Precision Gears,” INFAC Program, IIT Research Institute, sponsored by the U. S. Army Aviation and Missile Command (AMCOM) Contract DAAJ09-95- C-5046.
- Quality Assurance of Chemical Measurements, John Keenan Taylor, Lewis Publishers, Inc., 6th Printing 1989, pages 25 – 26.
-
Download Resource
Please fill out the information below to receive the selected resource.
